Not long ago we blogged about how important audio quality is to maintaining a professional presence on video calls while working from home. That’s certainly true, but it’s not the end of the story.
Image quality is equally important to coming across as a pro in remote working and distance learning situations. If the social-distancing trends surrounding the recent COVID-19 pandemic outlast the virus as expected, the ability to recreate face-to-face interactions via technology will be essential to your organization’s near-future success.
Before you plan on skating by with a cheap webcam, consider this tidbit of advice about remote meetings (that applies equally to online classes) from leading video conferencing provider Zoom: “To make meetings come to life, you should have an adequate camera with a good frame rate and resolution…”
How can you be sure your camera meets those qualifications? It all starts with testing. High-quality camera technology providers put their cameras through intense image testing to ensure you’re getting the most out of your content and collaborations. Here’s a behind-the-scenes look at how engineers use an optical lab to develop devices with clear, clean, vivid imaging.
The Optical Lab
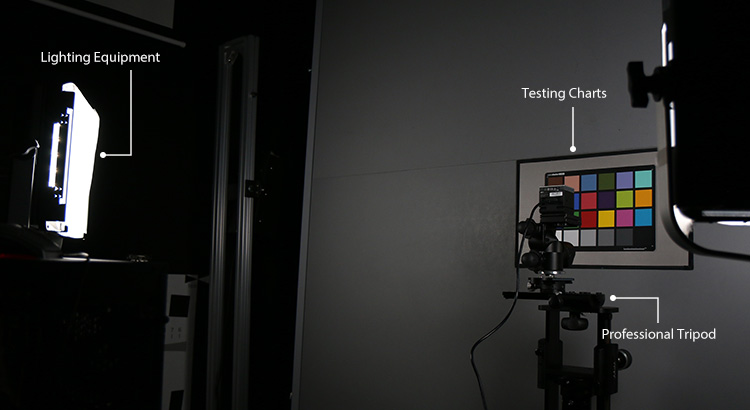
To properly test imaging quality, engineers need an environment that is completely dark so they have full control over the lighting. To get that, they construct an optical lab. A typical optical lab is a room in which the walls and floors are covered in black, non-reflective material. Optical labs feature the following equipment:
- Lighting Equipment — Various lamps and LED lights adjust to provide a full color temperature range for testing. A professional lab usually tests a range of 2,700 to 6,500 Kelvins (K) to ensure cameras are optimized for the varied lighting preferences in different markets.
- Professional Tripod — The camera is placed on a tripod that allows precise adjustments from all angles. A sliding rail system allows engineers to quickly move in and out to accurately test different fields of view.
- Testing Charts — Once the camera is secured on the tripod, it’s aimed at a testing chart. There are multiple types of testing charts for verifying different image-quality factors, including the ISO12233 resolution chart for image resolution and the X-Rite ColorChecker for color accuracy, color saturation, white balance error, exposure accuracy, etc.
- Testing Software — Data from the camera’s read of the charts feeds to a computer. Engineers use software to evaluate data points and make adjustments as necessary.
The Testing Process
There are many different components to the image-testing process. The AVer optical lab tests up to 40 different metrics. These testing items can be broken down into three main image-quality factors that engineers attempt to achieve in their cameras: clarity, vividness, and cleanness.
Clarity
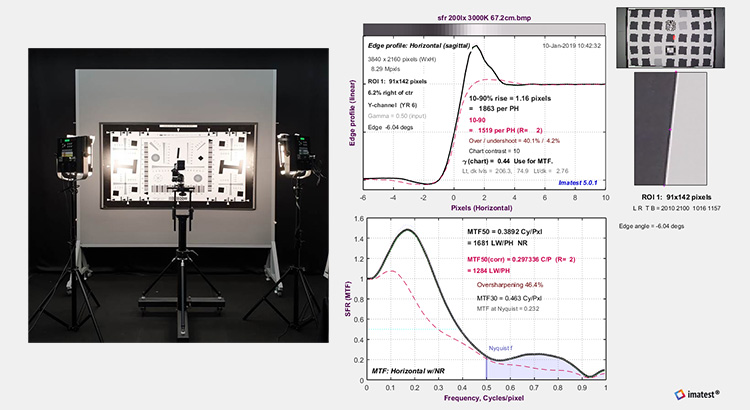
To ensure image clarity, cameras are put through their paces in front of an ISO12233 resolution chart. The process is simple—engineers capture an image of the chart with the camera and then use the naked eye and software to evaluate it. They determine at what point they can no longer see the white gaps between the black lines. That point indicates how many TV lines the image picks up, determining the resolution (i.e. 1080p, 4K). Testers also check the edges of the black bars on the chart for blurring.
Vividness
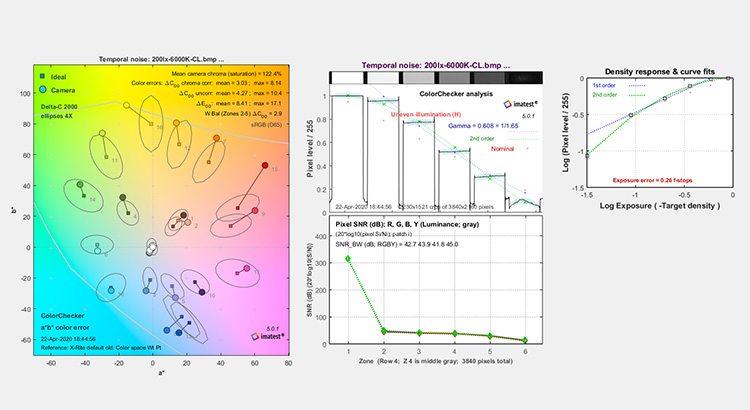
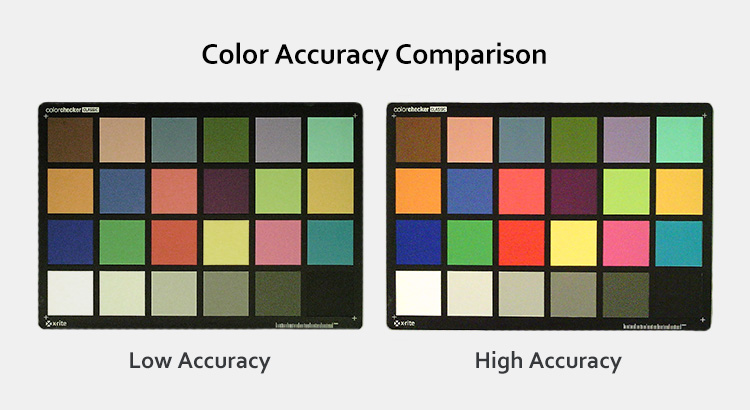
A quality camera reproduces vividly accurate colors. To test for this, engineers switch out the ISO12233 resolution chart for an X-Rite ColorChecker. They adjust the LED lights to the required intensity and use a lux meter to verify uniform illuminance. Because color is subjective to the human eye, the image from the camera is then evaluated with the help of software that compares the colors transmitted by the camera to an objective standard on the RGBY scale. The goal is to get the most lifelike colors possible.
Cleanness
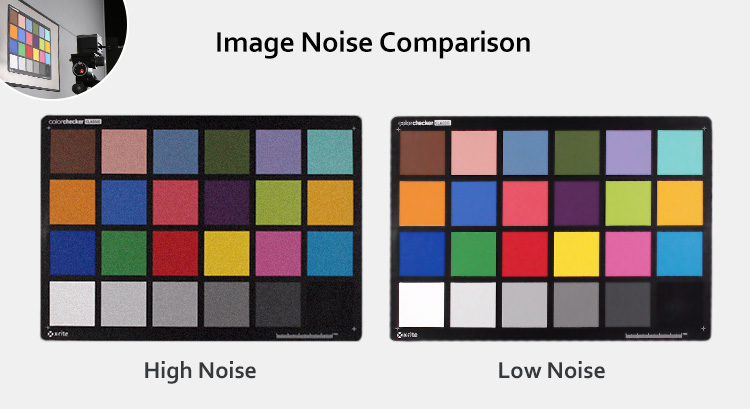
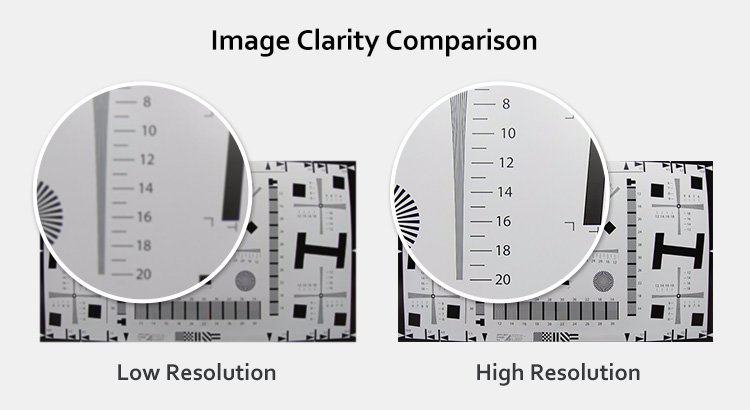
Finally, a high-quality camera must produce a clean image, one with as little noise as possible. In the above example, the image on the right shows lower noise than the one on the left. Testing for this visual noise is also done by capturing images of the X-Rite ColorChecker and software under various types of light conditions. Then, engineers fine-tune image parameters to eliminate noise from the finished product.
AVer Imaging
Here at AVer we use a state-of-the-art in-house optical lab to craft clear, vivid, and clean imaging in devices for business and education. From 4K document cameras optimized for distance learning to USB plug-and-play conferencing cameras, our solutions go through full testing to prove their quality before they take their leading positions in the market. Click the button below to make sure you appear professional from wherever you work.
Special thanks to Stanley Hsia, Frank Lin, Gary Huang, James Chu, Richard Lin, Anderson Jiang, and the rest of the AVer engineering team for providing detailed information and demonstrations for this article.