It’s pretty common knowledge that in order to hold an effective online meeting, you’d need a good audiovisual system, a stable internet connection, and a quiet room to do it in. However, there is much more to it if you want your meeting experiences to be more successful and professional. Having the bare necessities is merely the first step in hosting a successful online meeting. To make your online meetings even better, you’d have to ensure your room is properly set up with your technologies in their optimal settings. By doing so, you can prevent unprofessional distractions like awkward camera angles and poor audio quality. Understanding what your technologies can offer and the additional features they have in the settings will elevate both the quality of your online meetings and the effectiveness of your business collaboration.
Set up the correct camera angle
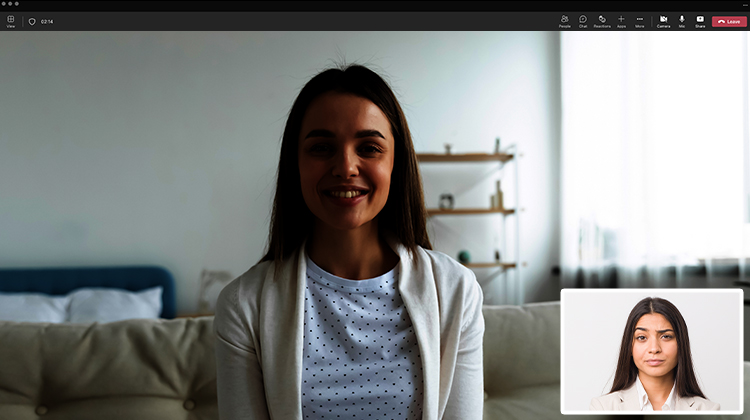
The first thing we are going to talk about is something that’s simple but easy to mess up. The visual aspect of your online meeting makes up for a huge part of the virtual experience. Hence, it’s important to make sure the camera’s field of view is able to capture every participant in the room. If you have a more traditional camera or is using the built-in camera on your laptop, a good way to check this is to test it out with a colleague before the meeting starts. However, if your camera comes with an auto-framing ability, then you can just let it do the work as it will automatically frame participants to ensure they are the primary focus on the screen. For better quality of life, some cameras also come with additional settings for the auto framing function.
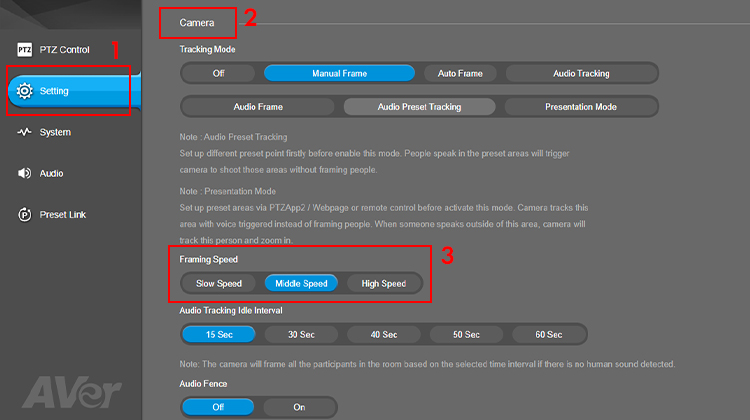
Take PTZApp 2 for example, a free software that is often used with many of our USB conferencing cameras and offers various customization and function controls. Among its settings, you can adjust the framing speed at which the camera frames people. Depending on the situation and the pace of the meeting, you may feel the need to crank up that framing speed to have the camera quickly capture and refocus its field of view on all participants. To do this, simply select Setting > Camera in the PTZApp 2 setting’s tab and locate the section called ‘Framing Speed’. Through PTZApp 2, you can also utilize Smart Gallery, an AI-powered technology that detects and crops every participant into individual frames on the stream, giving remote viewers a clear view of everybody on-site. On top of that, the Smart Gallery can automatically add and remove the individual frames of those that enter and leave the room during the online meeting, offering full automation and efficiency.
Consider your meeting environment
Now that your viewing angle is adjusted and ready to go, it is time to check whether the room you’re in has good lighting for your online meeting. Nothing screams more unprofessional than a dimly lit meeting room or an overexposed backdrop that hinders the remote participants from seeing your face. To prevent this from happening, make sure your curtains are rearranged depending on the time of the day and position your camera in a way that does not shoot directly into the sunlight. If the virtual conference software that you are using comes with additional settings for lighting, then it’s also worth taking a look to see what may be optimal. Let’s use PTZApp 2 again as an example, before starting your online meeting, you can pre-adjust lighting-related settings for your live stream to ensure there is a uniform lighting across every participant’s face. Aside from the basic settings such as brightness, sharpness, and saturation, the PTZApp 2 also allows white balance adjustment and temperature color balance for various lighting conditions. There is also a low light compensation mode which you can enable if your meeting room lacks proper lighting. Furthermore, if your meeting room is in a back light environment and has problems with exposure to light, the software can also turn on “True Wide Dynamic Range (WDR)” in cameras with this function, which essentially compensates images to maintain a balance between the brightness and darkness of the room. By understanding what your selected software can do, it can notably improve the image quality of your live stream and create an even more ideal meeting environment for all.
Examine your audio parameters
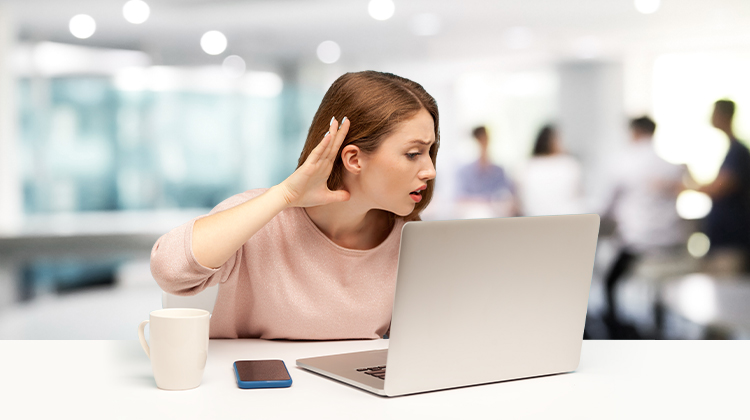
While you may think every laptop today that has a built-in microphone system is enough for online meetings, there is a limit to how much they can achieve with its audio quality. For bigger meetings or conferences, what you hear on your side may not sound as clear as you’d think to the people that are listening online. Background noises such as keyboard typing, loud air conditioning/fans, or the constant murmurs of a few dozen people in one room may all affect the overall quality of your meeting experience. If you’d like a more ideal solution to prevent background disturbance and unwanted ambient noises from affecting your meetings, then it may be beneficial to pay extra attention to your audio parameters. The most simple way to remedy this is to invest in a camera or a microphone that can serve as your audio input/output aside from your laptop. But you shouldn’t stop there – many compatible software that you use with your hardware have additional technical settings that can be enable or disable to your liking. Things like noise suppression, echo cancellation, and keyboard noise suppression are just some of the examples that you can choose to turn on.
Although you can’t completely avoid technical issues from happening, it is definitely possible and worth your time to reduce these issues from occurring during your online meetings. While little details like these may seem insignificant at first, the accumulation of these small improvements may just be what kicks your meeting quality up a notch.