The hybrid teaching method is becoming a common and valuable strategy in the education system worldwide. As mentioned briefly in our past AVer Experts on virtual parent-teacher conferences, the concept of hybrid teaching is nothing new; in fact, it has been around since the early 2000s. But it is because of the rapid technological innovation in the past decade and the recent pandemic our world is still adapting to that pushed hybrid teaching into the current spotlight.
Choosing the right distance learning technology is absolutely essential in creating a successful hybrid learning space where students at home and in classroom are getting equal amounts of education. One of the most important distance learning technologies that assists with this is no other than the camera. Since hybrid teaching relies heavily on the visual aspect of learning, particularly for students participating at home, having the right camera technology should be a preliminary step before deciding anything else. Without the appropriate equipment, the active learning and collaboration between students may be affected. Hence, it is important to at least get the right camera technology in order to ensure your hybrid teaching will be accessible and productive.
While this may be easier said than done, especially when you are investing in a long-term equipment, we will be breaking down the differences between various distance learning cameras to help you get started with your decision making.
Types of Distance Learning Camera
There are two main types of distance learning camera: an auto tracking camera and a USB document camera (commonly known as a visualizer). While both are designed for distance learning, there are notable differences between the two. How you decide between them will depend on what your teaching style is and what type of classroom environment you have. But before we get ahead of ourselves, let’s take a look at each type of distance learning camera in detail to help you better understand the choices.

Auto Tracking Cameras
Like the name suggests, an auto tracking camera is one that auto-tracks the teacher’s movement and allows them to walk around freely without having to worry about being out of frame. There are 3 AI-auto tracking modes offered by AVer’s auto tracking cameras:
- The Presenter mode can track the teacher around the entire classroom while giving remote students a sense of immersion and a clear view of what’s going on.
- The Zone mode allows teachers to set up content zones of the blackboard, projector screen, etc., to provide accurate segmented tracking in which the camera will automatically switch its field of view from one content zone to another based on the teacher’s position. As such, the camera will move steadily in a horizontal manner by following the teacher as they move across various chalkboards or monitors.
- The Hybrid mode gives teachers the utmost freedom with their movement, combining Zone tracking to automatically snap the camera’s view to the content zone as they walk into it, and then seamlessly transition back to Presenter mode when they leave that zone.
To top it off, the plug-and-play connectivity of these cameras means faster set-up and less stress for teachers when it comes to equipment preparation. These tools are perfectly designed for distance learning because it gives both teachers and remote students a sense of normalcy in school despite the hybrid dynamic. A lecture recording software is also typically used with an auto tracking camera, such as CaptureShare, to record teachings in real-time, and makes it very helpful to students as they can replay the lessons for later review.
Furthermore, auto tracking cameras can zoom in without distorting the view or resolution, providing remote students an experience that’s close a face-to-face learning experience. At AVer, there are two types of auto-tracking cameras, the DL30, and a smaller, portable DL10. The DL30 offers 12X optical zoom, making it very suitable for bigger rooms such as 7 to 12-grade classrooms. The DL10, on the other hand, has 3X optical zoom, which is more ideal for smaller classrooms designed for students in kindergarten to 6-grade. Depending on the school’s environment and the country’s regulation, teachers can utilize a DL30 if they’re mostly expected to teach in bigger classrooms, whereas a DL10 would be more suitable for teachers in a space-conscious classroom or have to alternate between teaching from home and at school.
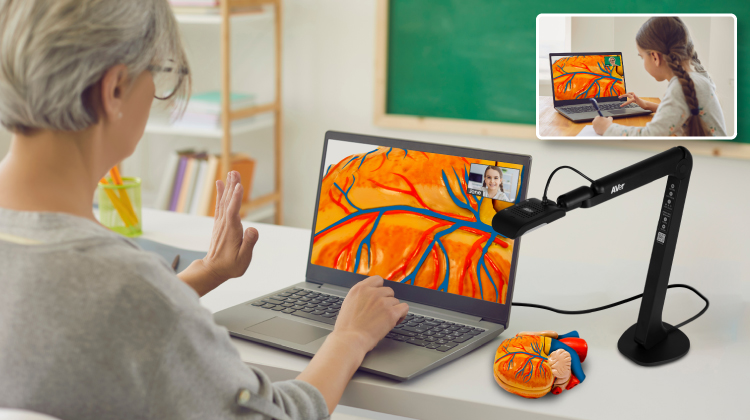
USB Visualizers
The other type of distance learning camera is a USB visualizer, which specializes in capturing and displaying teaching materials that are hard to digitalize. For example, if the teacher is doing crafts in class and needs to show how to make something step by step, having a visualizer would make the whole teaching process much easier by capturing every hand movement up close. Teachers can be at ease knowing that even students at home will be able to see what they’re doing. Additionally, the USB plug-and-play functionality and the flexible viewing angles of these cameras allow teachers to efficiently teach at any given time. The USB visualizers also come in different variety – some have mechanical arms that ensure the viewing distance between the camera and the object you’re displaying is always consistent, while others have flexible arms that allow you to rotate and bend in any direction you’d like. Compared to an auto tracking camera, a USB visualizer is more proactive and interactive in the sense that all objects can be displayed theoretically in a very close-up manner, regardless of if it’s two or three-dimensional. Last but not least, if you are a Google Classroom lover, then you may also be interested to hear that as AVer is part of the Google Cloud Partner Program, you can take images and videos via this learning platform by connecting one of our USB visualizers to the AVerTouch software.
Both types of distance learning camera have its unique beneficial qualities; however, if you’re in a situation where you’d only pick one, then it is important to go over their differences as mentioned above and consider your teaching needs. If your teaching curriculum is more text-heavy and lecture-based, then an auto tracking camera may be more suitable for you. On the other hand, if you are a more hands-on teacher that often uses physical objects or require hand-held materials to be viewed up close, then a USB visualizer may be what you’re looking for.